Tuesday, May 7, 2013

{diy growth ruler}

So I know I said that I was going to do a whole big blog post with tutorials when we finished our new apartment's makeover but I think I'll just post tutorials as I finish them : )

Today I finished making Anders a growth ruler! I have seen these for sale on Etsy for $50 plus $15+ shipping. Whoa! But I really love them! Therefore I decided make it myself.

Here's what you need:

- a plank of wood; I used a board that was 9in x 6ft x 1in - $6
- stain - already had some but you can get it @ Lowe's $6
- paint brush - already had one but you can get one for $3 @ Lowe's
- vinyl or black paint - $7.80
- measuring tape
- picture hanging hardware - $1.50

Total for Me: $15.30      Total if you don't have everything: $24.30

I went to Lowe's and got a 9in x 6ft x 1in plank of wood. I am not sure what type of wood I just looked for the cheapest one : ) But make sure it is pretty straight and lies flats! When you hang it up you want it to lay flat along the wall. You'll also need to pick out a stain you like and a paint brush. This is the stain that I used. I only did one coat and it was the perfect color.

In a well ventilated area stain the wood (I only did the front and sides since no one will see the back) and let it dry. I let mine dry for a couple days.
Next you will mark the inch and foot marks on the board. I am fairly certain my children will be over 6 foot tall as their father is 6'5" and I'm no shorty either. That being said I wanted my ruler to reach at least 6'5". So I decided to have my board hang 9 inches above the floor; which would allow my board to reach a height of 6'8". Find what works for you! After you figure out what inch you want your ruler to start on take a measuring tape and lay it along the edge of the board and with a Sharpie mark each inch and foot marks. Like so.

This next step requires choosing whether you want to use vinyl or black paint or Sharpie. I chose vinyl because I don't trust my painting skills and the Sharpie doesn't look as good in my opinion. I had some black vinyl already that I cut the dashes out of. My inch dashes are 1 inch long and 1/4 inch thick and my foot dashes are 3 inches long and 1/4 inch thick. Then on Etsy I found a lady that makes vinyl numbers 1-6 that are 4 inches tall. So I ordered them for $7.79. Here's the link. She has a lot of other cute vinyl wall decals too! I just ordered a bunch from her....you'll see them in our new apartment! Anyway, next you will lay the vinyl dashes over your marks you made with the Sharpie and press them down really good. Then I decided to put my numbers in front of the foot dash mark but you can put them where ever you want. 

The last step is to add hanging hardware. I haven't decided which to use yet but both will work!
               

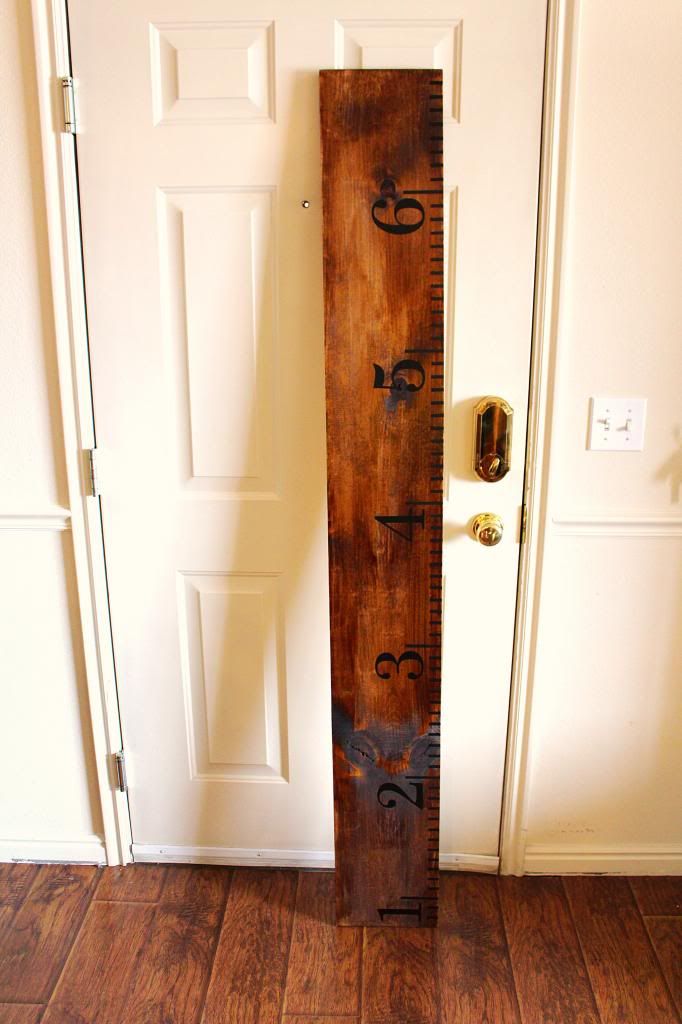
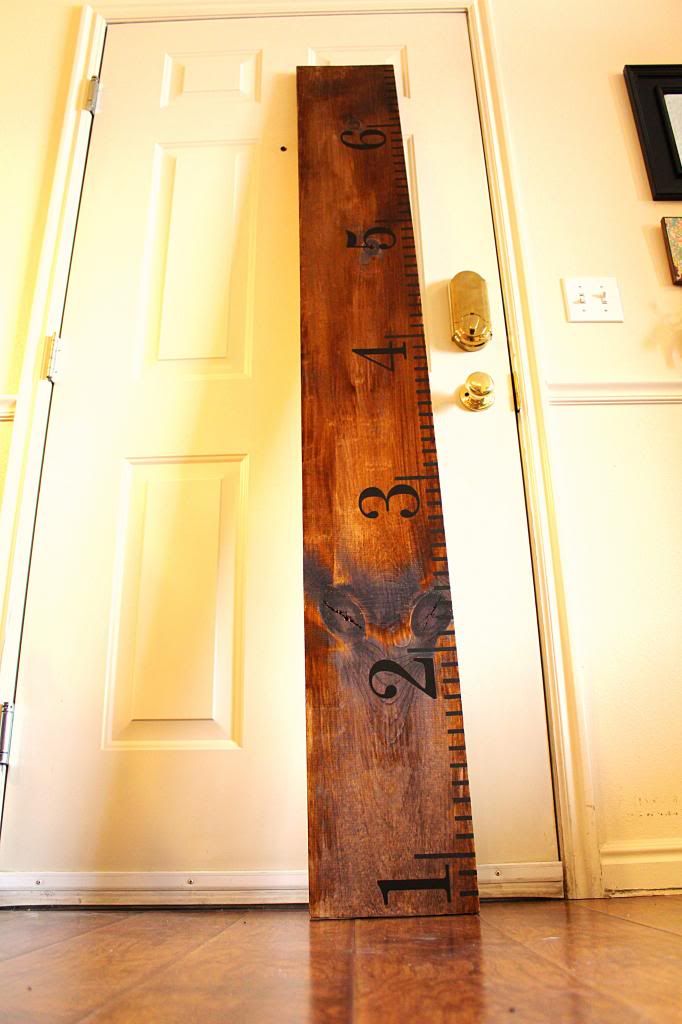
Here is the finished product! I LOVE it and I can't wait to show you what I have planned for this!


Sunday, May 5, 2013

{best cafe rio sweet pork salad copycat recipe}

I have been meaning to try this copycat Cafe Rio recipe since I pinned it over a year ago. Friday night I finally did it! Lots of work but so worth it! Here is a link to the whole Sweet Pork salad/burrito recipe courtesy of Favorite Family Recipes.

It tastes just like the real deal. I found a really good deal on pork ($0.99/lb) so I bought 7 pounds (recipe only calls for 2). But I thought that since I was going to be going through all the work might as well make lots. I get the "If some is good, more is better" mentally from my husband. : ) So I tripled all of her recipes. I am so glad I did. We invited two couples over to join in the feast. Even then we had so much left over! I played in a soccer game that night and was starving again after so I made myself another huge sweet pork salad. Then Saturday Garett and I had it for lunch. And there is still enough left for at least two more sweet pork salads after church tomorrow! It has been an awesome weekend. What's better than Cafe Rio everyday?! Not much.

A Few Suggestions:

- I would suggest making the salad dressing the night before you want to use it. I am finding that the longer it sits the better it tastes.
- Let the pork sit in the marinade for as long as possible too!
- Lastly, like the ladies at Favorite Family Recipes say you have to get the aluminum foil bowls for the full effect. They said they got theirs at a grocery store but all the grocery stores I went to wanted an arm and a leg for them....weird I know. But I found them at the dollar store!!! A pack of 3 for a buck (they even came with the to-go lids!). Swa-eet!

My favorite part is the cilantro-lime vinaigrette! I still have over half a mason jar left! Can you say delicious salads?! 

I think I used every dish I own....twice! This is only a small portion of the mess. But again, it was so worth it!

Friday, May 3, 2013

{awesome cupcake frosting}

Want the best cupcake frosting I have ever used?! Check out this link. It is delicious (tastes kind of like marshmallow creme), easy to make and looks so good. Below is a picture of some cupcakes I made for a baby shower. I tinted the frosting blue and printed out a bunch of "Oh Boy!"s and used my cloud punch to punch them out. I think they add a nice simple touch. I have pictures of other cupcakes with this frosting that I'll post as soon as I find them...I think they are on my old phone :-)

Wednesday, May 1, 2013

{moving}

Important tips to follow when moving.


Tuesday, April 30, 2013

{healthy toddler muffins}

I'm a huge fan of homemade baby food. It's way cheaper than buying it and you know exactly what's in it. But my little man is growing up and eating more chunky food. I really like grab-n-go food. Awhile ago I pinned a recipe for a healthy toddler muffin and finally today I decided to try it out. Here is that recipe. But I had a bunch of sweet potatoes to use up and didn't want to use butter so I decided to make up my own recipe. I think that it turned out really well. Andersen liked them and I really liked them too.

Healthy Toddler Muffins

1 large sweet potato (baked until soft)

4-5 ripe bananas
1 cup grated carrots
1 cup applesauce
1/2 cup packed brown sugar
3 eggs
1 Tbsp vanilla
1 Tbsp nutmeg
1 Tbsp ginger
1 Tbsp cinnamon
2 Tbsp baking soda
3 cups unbleached flour
1 cup oats
chocolate chips (optional)

Preheat oven to 350 degree and grease a muffin tin. Mix sweet potato, bananas, carrots, sugar, eggs and vanilla in bowl with electric mixer. In another bowl mix together spices, soda, flour and oats. Stir dry ingredients into wet ingredients. Stir in chocolate chips if you want. Fill muffin cups half way and bake for 10 minutes. Makes 4 dozen muffins.


I had a sweet heart shaped muffin tin so I made them in that. A little extra love for my little man : )

Monday, April 22, 2013

{super easy & flattering skirt tutorial}

I love stretchy skirts! Not only are they extremely comfortable they are also really easy and cheap to make.

Materials:


- 1/2 to 1 yard of stretchy knit material (depending on the length you want)
- 1/2 to 1 yard stretchy knit material for lining (optional; I was able to read a newspaper through my fabric!)
- Matching thread
- 3 inch elastic (sold in a 2 yard pack @ Joann's for $3.50; enough make a couple skirts!)

Knit fabric ranges from $5.99 to $14.99/yard depending on the brand and design. The cuter the print the more expensive it tends to be. This is why I love remnant piles! I hoard remnants like crazy! Most fabric stores sell their remnants for 50% off. The black ruffle material I'm using in this tutorial was a remnant. It was just under a yard and I got it for $5. Since I did a knee length skirt I still have enough leftover material to make another one if I want. 

 1. Grab the elastic and put it around your waist where you want the skirt to sit. Make sure you pull it a little snug so the elastic is tight when you wear the skirt. Cut off the excess elastic and sew  the two ends together with a straight stitch about a 1/4 inch from the edge. I also took some anti-fray liquid and ran it along the edge.

 2. Next I took both my materials, laid them out, lined them up and pinned the edges. (I didn't want my lining to go all the way to the bottom of my skirt so I brought it up a couple of inches.) If your fabric is thick enough you don't need a lining so you can skip this step.


3. Then fold your materials in half and line up your elastic band with top of the folded material. I have about 2 inches of extra material. Just trim off any extra material in a straight line down to the bottom. 

***If you are wider at the hips or in the thigh region you can cut a curved line from the waist to the bottom of the skirt. So it curves out around the hip and thigh area and gives you a little more room.


 4. Next pin the right sides of the material together and now you are ready to sew up the side! I did a baste stitch first because if you try and do a zigzag stitch first on stretchy fabric it bunches up all weird. At least it has for me. After the baste stitch follow with a zigzag stitch that also has straight stitches....not sure what it's called. Haha.

5. Pin the right side of elastic band to the right side of the material and do the same zigzag stitch that you did to sew up the skirt.


Viola! You are done!!!


Monday, April 15, 2013

{life update}

Wow life is crazy! But that's good. Ander's Attic has been a bigger success than I could have ever imagined! It's been a huge blessing in our lives right now. And it has been so fun! I just made this one for my giveaway winner!


Since we are moving to a new apartment upstairs in a couple weeks I had to put my shop on vacation mode! I'm so excited to move. I have so many DIY projects I want to do. My favorite one is an ottoman! Anders loves to pull himself up on our coffee table and he usually bonks his head. I think an ottoman will work perfectly for us. I have researched a few tutorials but haven't been able to find one that I really like. So I'm going to take a few elements from each one and hopefully (fingers crossed) create the ottoman that I have imagined in my head. If it turns out well I'll post what I did.

Right now Garett is in crunch time for finals. How he does in his accounting prerequisites that he is finishing up now will greatly affect whether or not he gets into the accounting program. He has A's in all of his courses right now so all he needs to do is do well on the finals. He applies for the accounting program this week. Fingers crossed that he gets in. I think he will. He wrote an amazing essay, has awesome grades and he was just appointed to be an officer in one of the accounting clubs he is in on campus. He also recently interviewed for a job in the accounting department! We should find out this week if he got it! What a stud!

I have just been enjoying life with my boys. I love being a wife and I love love being a mother. I'm not going to lie it is hard as heck sometimes but thankfully the good days greatly outweigh the bad ones.  My little guy is growing up so fast. Here's a little update:

- At his 9 month appointment he weighed 21 lbs and was 30 inches long. He is in the 95th percentile for height and 63rd percentile for weight. He's tall and lean like his father : )

- He is pulling himself to standing position and walks along things. I'll be at my bathroom counter getting ready and I'll suddenly see little fingers reaching for my makeup brush. Let the serious baby-proofing begin.

- He can say momma!!!!! This just makes me ecstatic. Me reached for me a couple days ago and said it. He now says it all the time and says it when I ask him to! Poor daddy is still trying to coax a dadda out of him.

- He has two lower teeth and has 4 upper teeth coming in! Can we say drooly?! There is drool everywhere, on everything!

- He eats table food regularly. I love this! He can eat pretty much anything we eat for dinner.

Now it's time to dump some pictures.


So hot!!!! I have the hottest husband. 


Daddy was holding his feet so he couldn't go anywhere!


He was trying to figure out how to get under the bed.


"Wake up Daddy!"

"Here, let me give you some of my brain power!"

Just eating some chicken pot stickers!

Look at those teeth!


I feel so blessed to have these 2 amazing boys in my life!